From Novice to Expert: How to Master the Art of Scuba Diving

Scuba diving is an exciting and rewarding activity that allows you to explore the underwater world and witness the beauty of marine life. However, scuba diving also requires a certain level of knowledge and skill to ensure safety and enjoyment. In this article, we will guide you through the basics of scuba diving and teach you how to master the techniques needed to become an expert diver.

Understanding the Basics

Before you can start scuba diving, it’s important to understand the physics and physiology behind it. Scuba diving involves breathing compressed air underwater, which means you are exposed to a different environment than on land. The deeper you go, the more pressure you will experience, which can cause various physiological effects on your body.

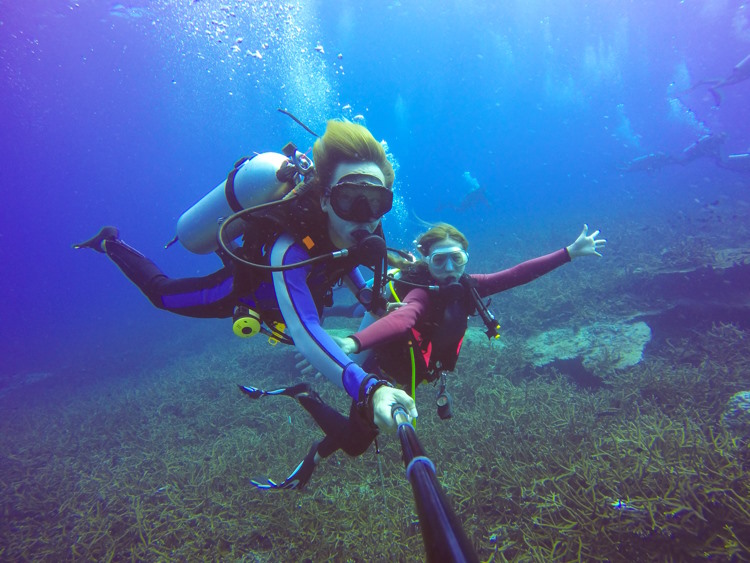
To ensure your safety, it’s important to learn about the equipment and gear needed for scuba diving. This includes a wetsuit, fins, a mask, and a regulator, which controls the air flow from the tank to your mouth. You should also learn about the safety guidelines and precautions for scuba diving, such as checking your gear before each dive, diving with a buddy, and knowing how to signal for help if necessary.

Learning the Techniques

Once you have a basic understanding of scuba diving, you can start learning the techniques needed to become a skilled diver. These techniques include descending and ascending, equalizing pressure, controlling buoyancy, and underwater communication.

Descending and ascending involves controlling your buoyancy and adjusting your ear pressure as you move up and down in the water. To descend, you should release air from your buoyancy control device (BCD) and use your fins to move downwards. To ascend, you should add air to your BCD and use your fins to move upwards. It’s important to equalize your ear pressure by swallowing, yawning, or using the Valsalva maneuver to prevent ear pain or injury.

Controlling buoyancy is crucial for maintaining your position in the water and conserving energy. You can control your buoyancy by adding or releasing air from your BCD or adjusting your weight system. Underwater communication is essential for diving with a buddy and signaling for help if necessary. You should learn the basic hand signals and practice them with your dive partner before each dive.

Advancing Your Skills

Once you have mastered the basic techniques, you can start advancing your skills as a scuba diver. This includes learning more advanced techniques such as night diving, deep diving, wreck diving, and navigation. These techniques require more specialized training and experience, but can add to the excitement and enjoyment of scuba diving.

Night diving involves diving at night using specialized equipment such as dive lights to explore the underwater world in a different light. Deep diving involves diving to depths beyond the recreational limit of 40 meters and requires special training and equipment. Wreck diving involves exploring sunken ships and other underwater structures, and navigation involves using a compass and other tools to navigate underwater.

Common Mistakes and How to Avoid Them

Even experienced divers can make mistakes that can compromise their safety or enjoyment. One common mistake is not checking your gear before each dive, which can result in equipment failure or malfunction. Another mistake is not monitoring your air supply, which can lead to running out of air or ascending too quickly. It’s important to always follow the safety guidelines and precautions and to dive within your level of training and experience.

Frequently Asked Questions

Here are some frequently asked questions about scuba diving:

How do I choose the right scuba diving equipment?
Choosing the right scuba diving equipment depends on your personal preference, budget, and diving needs. It’s important to research and compare different brands and models before making a purchase. You should also consider factors such as fit, comfort, and durability.

Can anyone learn how to scuba dive?
While anyone can learn how to scuba dive, it’s important to have a certain level of physical fitness and good health. You should also be comfortable in the water and have basic swimming skills. Before starting your scuba diving training, you may be required to undergo a medical examination to ensure you are fit to dive.

Is scuba diving dangerous?
Scuba diving can be dangerous if proper safety guidelines and precautions are not followed. However, with proper training, equipment, and experience, scuba diving can be a safe and enjoyable activity. It’s important to always dive within your level of training and experience and to never exceed the limits of your equipment or personal abilities.

How long does it take to become a certified scuba diver?
The length of time it takes to become a certified scuba diver varies depending on the course and training program. Most entry-level scuba diving courses take between 2-4 days to complete, while more advanced courses can take several weeks or months.

Can I dive if I wear glasses or contact lenses?
Yes, you can still dive if you wear glasses or contact lenses. However, you will need to wear a special diving mask that can accommodate your corrective lenses or consider getting corrective surgery to eliminate the need for glasses or contact lenses.

Conclusion

Scuba diving is a thrilling and rewarding activity that allows you to explore the underwater world and witness the beauty of marine life. By understanding the basics, learning the techniques, advancing your skills, and avoiding common mistakes, you can master the art of scuba diving and enjoy a lifetime of underwater adventures. Just remember to always prioritize safety and follow the guidelines and precautions for a safe and enjoyable diving experience.

Revolutionizing Skincare: The Role of Pico Laser in Treating Pigmentation

In the ever-evolving world of skincare, the quest for effective and revolutionary treatments continues. pico laser for pigmentation has emerged as a game-changer in the realm of pigmentation treatment, offering a transformative approach to achieving clearer and healthier skin.

Understanding Pigmentation Issues

Pigmentation concerns are widespread and can significantly impact skin health and appearance. From dark spots to uneven skin tone, addressing these issues requires advanced solutions that go beyond traditional methods.

Traditional vs. Advanced Pigmentation Treatments

Traditional pigmentation treatments have limitations in terms of efficacy and downtime. Pico Laser, or “hilangkan jeragat di muka” as an advanced solution, brings a new level of precision and effectiveness to pigmentation therapy, revolutionizing the way we approach skin concerns.

How Pico Laser Works

At the heart of Pico Laser’s effectiveness lies its innovative technology. This section delves into the science behind Pico Laser, explaining how it differs from traditional laser systems and outlining its advantages in treating pigmentation.

Tailoring Treatment to Individual Needs

One size does not fit all in skincare. Pico Laser stands out for its ability to be customized for diverse skin tones and types. Understanding how Pico Laser addresses specific pigmentation issues ensures a tailored and effective treatment plan.

The Treatment Experience

Navigating a Pico Laser pigmentation session can be demystified by understanding the step-by-step process. From the initial consultation to the post-treatment period, patients can gain insight into what to expect at each stage.

Post-Pico Laser Care: Nurturing the Results

Achieving optimal outcomes with Pico Laser involves proper aftercare. This section emphasizes the importance of post-treatment skincare routines and provides specific guidelines to nurture and maintain the results.

Real Results, Real Stories

The real impact of Pico Laser comes to life through the stories of individuals who have undergone the treatment. Before-and-after transformations and success stories illustrate the tangible results and boost confidence in the efficacy of Pico Laser.

Pico Laser vs. Other Pigmentation Treatments

Comparisons with traditional lasers and alternative pigmentation therapies highlight the unique advantages of Pico Laser. Understanding these distinctions empowers individuals to make informed choices about their skincare journey.

Addressing Concerns and Misconceptions

To embrace the revolutionary potential of Pico Laser, addressing common myths and concerns is essential. This section aims to debunk misconceptions and provide clarity on safety and potential side effects associated with Pico Laser treatment.

The Economic and Social Impact of Pico Laser

The increasing demand for advanced skincare solutions reflects a broader societal shift towards embracing non-invasive cosmetic procedures. This section explores the economic and social implications of Pico Laser’s growing popularity.

Choosing Pico Laser: What to Look For

Selecting the right clinic for Pico Laser treatment requires careful consideration. This section outlines key factors to look for, ensuring professionalism, expertise, and safety in the chosen facility.

Pico Laser for Holistic Skin Transformation

Pico Laser goes beyond addressing pigmentation concerns; it contributes to holistic skin transformation. Exploring additional benefits for overall skin health underscores the comprehensive approach Pico Laser brings to skincare.

Staying Informed: Trends in Pico Laser Technology

Continuous advancements in Pico Laser technology drive ongoing innovations. Staying informed about these trends is essential for skincare enthusiasts looking to explore the latest developments in pigmentation treatment.

Conclusion

In conclusion, Pico Laser has revolutionized the landscape of pigmentation treatment, offering a pathway to clearer, healthier, and more radiant skin. The transformative possibilities it presents invite individuals to embark on a skincare journey that goes beyond traditional methods.

FAQs

  1. Is Pico Laser suitable for all skin types?
    • Pico Laser is designed to be safe and effective for various skin tones and types. A consultation with a dermatologist can determine its suitability for individual cases.
  2. How many sessions are typically required for noticeable results with Pico Laser?
    • The number of sessions varies based on individual skin concerns. Visible improvements are often observed after a few sessions, with optimal results appearing over time.
  3. What sets Pico Laser apart from traditional lasers in pigmentation treatment?
    • Pico Laser’s innovative technology delivers shorter pulse durations and faster results, minimizing downtime and providing enhanced precision in targeting pigmentation.
  4. Are there any side effects associated with Pico Laser treatment?
    • Temporary redness and mild swelling are common and typically subside within a few hours. Serious side effects are rare, and adherence to aftercare guidelines helps minimize any potential discomfort.
  5. Can Pico Laser be combined with other skincare treatments?
    • Combining treatments should be discussed with a dermatologist to ensure safety and compatibility. Pico Laser can synergize with certain procedures for comprehensive skincare benefits.

The Health Benefits of Diving: How Scuba Can Improve Your Mind and Body

Scuba diving is an exhilarating and adventurous activity that has become increasingly popular in recent years. Not only is it a great way to explore the wonders of the underwater world, but it also provides numerous health benefits for both the mind and body.

Physical Health Benefits

Scuba diving offers many physical health benefits that can improve overall fitness and well-being. For starters, it is an excellent way to improve cardiovascular health and circulation. The constant movement and exertion required to move through the water provides an effective aerobic workout that can help to strengthen the heart and improve blood flow throughout the body.

In addition to improving cardiovascular health, scuba diving also strengthens muscles and increases flexibility. The resistance of the water against the body helps to build and tone muscles, particularly in the legs, arms, and core. Furthermore, the constant movement and range of motion required while diving can help to increase overall flexibility and joint mobility.

Scuba diving also offers benefits for respiratory function. Breathing through a regulator underwater requires the diver to take slow, deep breaths, which can help to increase lung capacity and strengthen respiratory muscles. This can be particularly beneficial for individuals with respiratory conditions such as asthma.

Beyond physical fitness, scuba diving can also promote weight loss by burning calories. Diving can burn up to 500 calories per hour, making it a fun and effective way to shed excess pounds and maintain a healthy weight.

Finally, scuba diving can lower blood pressure and reduce stress levels. The calming and meditative effect of being underwater can help to reduce feelings of anxiety and promote relaxation. Additionally, the physical exertion and focus required while diving can help to reduce stress levels and improve overall mental well-being.

Mental Health Benefits

In addition to its physical health benefits, scuba diving also provides numerous mental health benefits. Studies have shown that diving can reduce symptoms of anxiety and depression, particularly when combined with therapy or other treatment modalities. The peaceful and calming effect of being underwater can help to reduce stress levels and promote a sense of relaxation and mindfulness.

Furthermore, scuba diving can improve mood and self-esteem. The sense of accomplishment and achievement that comes from successfully navigating underwater environments can help to boost confidence and self-esteem. Additionally, diving can provide a sense of adventure and exploration that can enhance overall feelings of happiness and well-being.

Scuba diving also provides opportunities for social interaction and community building. Joining a diving club or group can provide a sense of camaraderie and support, as well as opportunities to meet new people and make friends with similar interests.

Safety Precautions and Risks

While scuba diving offers numerous health benefits, it is important to take appropriate safety precautions to mitigate risks and ensure safe diving practices. Proper training and certification are essential for all divers, as is equipment safety and maintenance. This includes regularly checking equipment for damage, proper assembly, and proper function.

There are also risks associated with scuba diving, including decompression sickness, nitrogen narcosis, and more. Decompression sickness occurs when nitrogen bubbles form in the body due to rapid changes in pressure, and can be prevented by following proper decompression protocols and avoiding rapid ascents. Nitrogen narcosis occurs when nitrogen levels in the body become too high, and can be mitigated by diving within appropriate depth limits and avoiding activities that require complex decision-making or fine motor skills.

The Clownfish and Blue Malawi cichlids swimming near Coral Duncan

Frequently Asked Questions

What is the minimum age requirement to become a certified scuba diver?

The minimum age requirement for scuba diving certification varies by organization and country, but is typically around 10-12 years old. Some organizations also offer junior certifications for younger divers.

Can scuba diving be dangerous?

While scuba diving can be safe with proper training and equipment, it does carry inherent risks. It is important to take appropriate safety precautions and follow proper diving protocols to mitigate these risks. It is important to always dive with a buddy, monitor your air supply, and follow proper decompression procedures.

Do I need to be a strong swimmer to scuba dive?

While being a strong swimmer is beneficial for scuba diving, it is not a requirement. Divers are typically required to complete a swimming test as part of their certification, but this can vary by organization. However, it is important to feel comfortable in the water and have basic swimming skills before attempting to scuba dive.

Can scuba diving worsen my asthma or other respiratory conditions?

Scuba diving can actually be beneficial for individuals with respiratory conditions, as it can help to improve lung function and respiratory muscles. However, it is important to consult with a doctor before scuba diving, particularly if you have a respiratory condition or have had a recent respiratory infection.

How long does it take to become a certified scuba diver?

The time it takes to become a certified scuba diver varies by organization and training program. Most basic certification courses require a minimum of 18-20 hours of classroom and pool training, followed by several open water dives to demonstrate competency. The time required to complete these courses can range from several days to several weeks, depending on the organization and training program.

Can I scuba dive if I wear glasses or contact lenses?

Yes, it is possible to scuba dive with glasses or contact lenses. Many divers opt to wear prescription dive masks or contact lenses while diving. However, it is important to discuss any vision concerns with your dive instructor before attempting to dive.

Conclusion

In conclusion, scuba diving offers numerous physical and mental health benefits for individuals of all ages and fitness levels. From improving cardiovascular health and building muscle strength to reducing stress and promoting mindfulness, scuba diving is a fun and effective way to improve overall well-being. However, it is important to take appropriate safety precautions and follow proper diving protocols to mitigate risks and ensure safe and enjoyable diving experiences. With proper training and equipment, scuba diving can be a rewarding and life-changing activity that provides endless opportunities for adventure and exploration.

Say Goodbye to Cluttered Countertops with a Bathroom Mirror Cabinet

Do you find yourself struggling to keep your bathroom countertops free of clutter? Do you wish you had more storage space in your bathroom? If so, a bathroom mirror cabinet could be the solution you’ve been looking for.

A bathroom mirror cabinet is a multi-functional piece of furniture that combines a mirror with storage space. By installing a mirror cabinet in your bathroom, you can free up valuable counter space and keep your bathroom essentials organized and easily accessible.

In this article, we’ll discuss everything you need to know about bathroom mirror with cabinet, including what they are, how they work, and how to choose the right one for your needs.

What is a Bathroom Mirror Cabinet?

A bathroom mirror cabinet is a cabinet that is mounted on the wall above the sink and has a mirror attached to the front. The cabinet usually has shelves or compartments inside that can be used to store bathroom essentials such as toothbrushes, toothpaste, and skincare products.

Mirror cabinets come in a variety of styles and sizes, so you can choose one that fits your bathroom’s decor and storage needs. Some mirror cabinets are designed to be surface-mounted, while others are designed to be recessed into the wall for a sleeker look.

How Does a Bathroom Mirror Cabinet Help Declutter Countertops?

Bathroom countertops are often cluttered with toothbrushes, razors, makeup, and other bathroom essentials. This can make it difficult to find what you need when you’re in a rush, and can also make your bathroom look messy and disorganized.

By installing bathroom cabinets mirror, you can free up valuable counter space and keep your bathroom essentials organized and easily accessible. Instead of leaving your toothbrush and other items on the counter, you can store them inside the cabinet and keep your countertops clear.

Factors to Consider Before Buying a Bathroom Mirror Cabinet

Before you buy a bathroom mirror cabinet, there are a few factors you should consider to make sure you choose the right one for your needs.

Size and Space Constraints

The first factor to consider is the size of your bathroom and the amount of space you have available for a mirror cabinet. If you have a small bathroom, you may need to choose a smaller cabinet or one that is designed to be recessed into the wall to save space.

Style and Design Preferences

Another factor to consider is the style and design of the mirror cabinet. Mirror cabinets come in a variety of styles, from traditional to modern, so you can choose one that fits your bathroom’s decor.

Storage Needs and Capacity

You should also consider your storage needs and the amount of storage space you need. Some mirror cabinets have more storage space than others, so you should choose one that has enough space to store all of your bathroom essentials.

Lighting and Power Requirements

Finally, you should consider the lighting and power requirements of the mirror cabinet. Some mirror cabinets come with built-in lighting, while others require separate lighting to be installed. You should also consider whether the cabinet requires an electrical outlet or if it runs on batteries.

Beautiful luxury white bathtub decoration in bathroom interior – Vintage light Filter

Installation and Maintenance of Bathroom Mirror Cabinets

Installing mirror cabinets for bathroom is a relatively simple process that can be done by a DIY enthusiast. The first step is to measure the space where you want to install the cabinet to ensure that it will fit properly. Then, you’ll need to locate the studs in the wall and mark where you want to install the cabinet.

Once you’ve marked the location, you can drill pilot holes and attach the cabinet to the wall with screws. If the cabinet requires electrical wiring, you may need to hire an electrician to install an outlet or connect the cabinet to your home’s electrical system.

Maintaining a bathroom mirror cabinet is also relatively simple. You should clean the mirror regularly with a glass cleaner to keep it free of streaks and smudges. You should also clean the inside of the cabinet regularly to prevent the buildup of dust and dirt.

FAQs: Answers to Common Questions about Bathroom Mirror Cabinets

To help you learn more about bathroom mirror cabinets, we’ve compiled a list of frequently asked questions and their answers using vector representation technique.

Q: How much does a bathroom mirror cabinet cost?

A: The cost of a bathroom mirror cabinet depends on several factors, including the size, style, and materials used. On average, a basic mirror cabinet can cost anywhere from $50 to $200, while more advanced models with lighting and other features can cost upwards of $500.

Q: How do I choose the right size mirror cabinet for my bathroom?

A: To choose the right size mirror cabinet for your bathroom, you should measure the space where you want to install it and choose a cabinet that fits those dimensions. You should also consider your storage needs and choose a cabinet that has enough space to store all of your bathroom essentials.

Q: Can I install a bathroom mirror cabinet myself, or do I need to hire a professional?

A: Installing a bathroom mirror cabinet is a relatively simple process that can be done by a DIY enthusiast. However, if the cabinet requires electrical wiring, you may need to hire an electrician to install an outlet or connect the cabinet to your home’s electrical system.

Q: What kind of lighting options are available for bathroom mirror cabinets?

A: There are several lighting options available for bathroom mirror cabinets, including built-in LED lights, overhead lighting, and sconces. Some mirror cabinets also come with dimmer switches, so you can adjust the brightness of the lighting to suit your needs.

Q: Can I customize my bathroom mirror cabinet to fit my specific needs?

A: Many bathroom mirror cabinet manufacturers offer customization options, such as additional shelves or compartments. You can also choose from a variety of finishes and styles to create a mirror cabinet that fits your specific needs and preferences.

Conclusion

A bathroom mirror cabinet is a versatile and functional piece of furniture that can help you declutter your bathroom and keep your essentials organized. By considering the factors we’ve discussed in this article, such as size, style, and storage capacity, you can choose the right mirror cabinet for your needs and enjoy a more organized and functional bathroom.

Expert Tips for Optimizing Magento Hosting Performance in Australia

Magento is one of the most popular e-commerce platforms in the world, offering businesses of all sizes a powerful set of tools for managing online sales. However, to get the most out of Magento, it’s essential to optimize your hosting performance. This article will provide expert tips for optimizing managed Magento hosting performance in Australia, including using content delivery networks (CDNs) and optimizing images and videos.

Introduction

When it comes to e-commerce, speed is everything. Customers expect fast page load times and a smooth, seamless shopping experience. However, if your Magento hosting performance isn’t optimized, you could be missing out on sales and damaging your brand reputation. In this article, we’ll share some expert tips for optimizing Magento hosting performance in Australia.

Beautiful hacker girl working with another dangerous cyber criminals. Hackers centre.

1. Use a Content Delivery Network (CDN)

A CDN is a system of servers distributed across various geographic locations that serve content to end-users. Using a CDN can greatly improve the performance of your Magento store, as it reduces the amount of time it takes for data to travel from the server to the end-user.

When a user accesses your website, the CDN will serve the content from the server closest to their location, ensuring that they receive the content quickly. This not only improves page load times but can also help reduce server load, as the CDN takes care of serving static assets.

2. Optimize Images and Videos

Large images and videos can significantly slow down your website’s load times, which can negatively impact the user experience. To optimize your site’s performance, make sure that all images and videos are properly optimized.

You can use image compression tools like TinyPNG or JPEGmini to reduce the size of images without affecting their quality. It’s also important to use appropriate file formats for images, such as JPEG or PNG, depending on the type of image.

For videos, consider hosting them on a third-party video hosting platform like Vimeo or YouTube, as they can take care of the optimization and delivery of video content.

3. Minimize HTTP Requests

When a user visits your website, their browser makes requests for various assets, such as images, scripts, and stylesheets. The more requests the browser makes, the longer it takes for the website to load.

To minimize HTTP requests, you can:

  • Combine multiple CSS and JavaScript files into a single file
  • Use CSS sprites to combine multiple images into a single image file
  • Minify CSS and JavaScript files to reduce their size
  • Remove unnecessary plugins and modules from your site

4. Use Caching

Caching is the process of storing frequently accessed data in memory or on disk, so that it can be quickly retrieved when needed. By using caching, you can significantly improve the performance of your Magento store, as it reduces the amount of time it takes to generate pages.

Magento comes with built-in caching functionality, which can be configured through the admin panel. You can also use third-party caching solutions like Redis or Memcached to improve performance further.

5. Optimize Server Configuration

The performance of your Magento store can also be affected by the server configuration. Here are some tips for optimizing your server:

  • Use a dedicated server or VPS instead of shared hosting
  • Choose a hosting provider with data centers in Australia
  • Use the latest version of PHP
  • Use a web server like Apache or NGINX
  • Enable server-level caching, such as opcode caching

By following these tips and best practices, you can optimize the performance of your Magento store and provide your users with a fast and seamless shopping experience.

Conclusion

Magento is a powerful and versatile e-commerce platform, but it requires careful optimization to ensure maximum performance. By using a combination of caching, CDNs, server optimization, and image and video optimization, you can greatly improve the performance of your Magento store and provide a better user experience for your customers. Remember to regularly monitor your site’s performance and make adjustments as needed to ensure that it continues to perform at its best. For a perfect Magento website, seek assistance from a professional Magento developer Australia.

FAQ

Q: What are some common causes of slow Magento hosting performance?

A: Some common causes include using a suboptimal hosting provider, not optimizing images and videos, not using a content delivery network (CDN), and not keeping the Magento software and extensions up to date.

Q: How can I optimize images and videos for my Magento website?

A: You can optimize images and videos by compressing them without losing too much quality, using the correct file formats (e.g., JPEG for photographs and PNG for graphics with transparency), and reducing their dimensions to the required size. There are also various image optimization tools and extensions available for Magento.

Q: What are some best practices for using a CDN with Magento hosting?

A: Some best practices include using a CDN that has servers located close to your target audience, configuring Magento to use the CDN for static assets, and setting appropriate caching headers on the CDN. You should also test the performance of your CDN regularly to ensure it is providing the expected benefits.

Q: Should I use a shared hosting plan or a dedicated hosting plan for my Magento website?

A: It depends on your specific needs and budget. Shared hosting plans can be more affordable but may not provide the same level of performance or security as dedicated hosting plans. If you have a large or high-traffic Magento website, or if you require custom configurations or software, a dedicated hosting plan may be a better option.

Q: How can I monitor the performance of my Magento hosting?

A: There are various tools and services available for monitoring Magento hosting performance, such as New Relic, Pingdom, and GTmetrix. These tools can help you identify performance bottlenecks, track uptime and downtime, and receive alerts when issues arise.

Mastering Tow Bar Tongue Setup: The Key to Load Optimization

In the realm of towing, efficiency and safety are paramount. One crucial aspect often overlooked by many is the proper setup of the tow bar tongue. Whether you’re hauling a trailer, boat, or any other load, optimizing your tow bar tongue setup is essential for a smooth and secure towing experience. In this comprehensive guide, we will delve into the intricacies of tow bar tongue setup, exploring the factors that influence it and providing actionable tips for maximizing efficiency.

Understanding Tow Bar Tongue Setup

Definition and Components

The tow bar tongue setup consists of various components that facilitate the connection between the towing vehicle and the trailer or load being towed. These components typically include the tow bar itself, the coupler, safety chains, and electrical connections for lights and brakes.

Importance of Proper Setup

Proper tow bar tongue setup is not merely a matter of convenience; it is a critical safety consideration. A poorly configured tow bar tongue can lead to instability, swaying, and even accidents. By ensuring the correct setup, you not only enhance safety but also optimize the towing performance of your vehicle.

Factors Influencing Tow Bar Tongue Setup

Weight Distribution

The distribution of weight on the tow bar tongue significantly impacts towing stability. Ideally, the tongue weight should be distributed evenly to prevent excessive strain on the towing vehicle’s rear axle. Proper weight distribution ensures balanced handling and reduces the risk of trailer sway.

Tow Vehicle Specifications

The specifications of the towing vehicle play a crucial role in determining the appropriate tow bar tongue setup. Factors such as towing capacity, wheelbase length, and suspension type must be taken into account to ensure compatibility and safety.

Type of Load

Different types of loads require different approaches to tow bar tongue setup. For instance, hauling a heavy trailer may necessitate the use of weight distribution hitches, while towing a boat might require adjustments to accommodate its unique shape and weight distribution.

Tips for Optimizing Tow Bar Tongue Setup

Calculate Tongue Weight

Accurately calculating tongue weight is the first step towards optimizing your tow bar tongue setup. This can be done using a variety of methods, including specialized tongue weight scales or simple calculations based on the load’s weight distribution.

Adjusting Height and Angle

Proper adjustment of the tow bar tongue’s height and angle is essential for achieving optimal towing performance. Ensuring that the tongue is level and at the correct height minimizes strain on the towing vehicle and promotes stability during towing.

Using Weight Distribution Hitch

For loads that exert significant downward force on the tow bar tongue, such as heavy trailers, a weight distribution hitch can be invaluable. These hitches redistribute weight from the rear axle of the towing vehicle to its front axle and the trailer axles, enhancing stability and control.

Implementing Sway Control

Sway control mechanisms, such as sway bars or friction sway controls, help mitigate the side-to-side movement of the trailer, commonly known as sway. By reducing sway, these devices enhance towing safety and confidence, particularly in adverse weather conditions or when passing other vehicles.

Regular Maintenance

Maintaining your tow bar tongue components is crucial for ensuring long-term reliability and performance. Regular inspections, lubrication, and replacement of worn parts are essential practices to prevent unexpected failures and maintain towing safety.

Case Studies and Examples

To illustrate the real-world impact of proper tow bar tongue setup, let’s consider a few hypothetical scenarios:

  • Scenario 1: Heavy Trailer Hauling
    • In this scenario, a truck equipped with a weight distribution hitch effectively distributes the tongue weight of a heavy trailer, resulting in stable and controlled towing even at high speeds.
  • Scenario 2: Boat Towing
    • Adjustments to the tow bar tongue setup accommodate the unique weight distribution of a boat, ensuring smooth launching and retrieval at the boat ramp without compromising towing stability.

FAQ Section

How do I calculate tongue weight for my tow bar setup?

Calculating tongue weight can be done by measuring the weight exerted on the tow vehicle’s hitch when the trailer is fully loaded. Specialized tongue weight scales or formulas based on load distribution can also provide accurate estimates.

Can I use the same setup for different types of loads?

While some aspects of tow bar tongue setup may remain consistent across different loads, it’s essential to adjust your setup according to the specific requirements of each load, including weight distribution and towing dynamics.

What role does the tow vehicle’s suspension play in tow bar tongue setup?

The tow vehicle’s suspension influences its ability to handle the weight and dynamics of the towed load. Vehicles with stiffer suspensions may require different setup adjustments compared to those with softer suspensions.

Are there any specific regulations or guidelines I need to follow when adjusting my tow bar tongue setup?

Regulations regarding tow bar tongue setup may vary depending on your location and the type of load you’re towing. It’s crucial to familiarize yourself with local towing laws and guidelines to ensure compliance and safety.

How often should I inspect and maintain my tow bar tongue components?

Regular inspection and maintenance of tow bar tongue components are recommended, particularly before embarking on long trips or towing heavy loads. Inspect for signs of wear, corrosion, or damage, and address any issues promptly to prevent safety hazards.

Mazda BT50 Snorkel: An Essential Guide for Off-Roading Enthusiasts

Are you an off-roading enthusiast looking to take your Mazda BT50 to the next level? If so, then investing in a snorkel may be just what you need. A snorkel is a vital accessory that not only enhances the look of your vehicle but also provides essential protection from water, dust, and other debris that could damage your engine. In this article, we’ll take a closer look at the Mazda BT50 snorkel and explore the benefits it offers to drivers.

What Is a Mazda BT50 Snorkel?

A Mazda BT50 snorkel is an accessory that is attached to the air intake of your vehicle. It extends the air intake to a higher position, usually above the roof of your car. By doing this, it helps to protect your engine from water, dust, and other debris that can enter the engine through the standard air intake.

Benefits of a Mazda BT50 Snorkel

1. Protection from Water

Off-roading can be unpredictable, and you never know when you’ll encounter a stream or a deep puddle. A Mazda BT50 snorkel ensures that your engine is protected from water damage, preventing costly repairs and unnecessary downtime.

2. Protection from Dust and Debris

Driving on dirt roads or through dusty terrains can be hazardous to your engine. The dust and debris can clog up your air filter, reducing the engine’s performance and lifespan. A Mazda BT50 snorkel keeps the air intake away from these elements, keeping your engine clean and running smoothly.

3. Improved Performance

By increasing the height of the air intake, a Mazda BT50 snorkel ensures that your engine is getting a constant supply of clean, fresh air. This results in improved performance, better fuel economy, and a smoother ride.

4. Enhanced Off-Roading Experience

Off-roading is all about pushing your vehicle to the limits and exploring new terrains. With a Mazda BT50 snorkel, you can take your adventures to the next level, knowing that your engine is protected from the elements and running at peak performance.

Choosing the Right Mazda BT50 Snorkel

When it comes to choosing the right Mazda BT50 snorkel, there are a few things to consider. Here are some key factors to keep in mind:

1. Quality

Make sure to invest in a high-quality snorkel made from durable materials. This ensures that it can withstand the toughest off-road conditions and provide reliable protection to your engine.

2. Compatibility

Check that the snorkel you choose is compatible with your Mazda BT50 model. This ensures that it will fit properly and work effectively.

3. Installation

Consider the installation process and whether you have the necessary skills and tools to install the snorkel yourself. If not, it’s best to have it installed by a professional to ensure it’s done correctly.

Conclusion

A Mazda BT50 snorkel is an essential accessory for any off-roading enthusiast. It provides vital protection to your engine, improves performance, and enhances your overall off-roading experience. When choosing a snorkel, be sure to consider quality, compatibility, and installation. With the right snorkel, you can take your adventures to the next level, exploring new terrains with confidence and peace of mind. You can obtain a Mazda BT50 snorkel from reputable brands such as Armax snorkel and Safari snorkel.

FAQs

  1. How does a Mazda BT50 snorkel protect the engine?
  • A Mazda BT50 snorkel protects the engine by extending the air intake to a higher position, away from water, dust, and other debris that can enter the engine through the standard air intake.
  1. Do I need to install a Mazda BT50 snorkel myself?
  • If you have the necessary skills and tools, you can install a Mazda BT50 snorkel yourself. However, if you’re not confident in your abilities, it’s best to have it installed by a professional to ensure it’s done correctly.
  1. Can a Mazda BT50 snorkel improve fuel economy?
  • Yes, a Mazda BT50 snorkel can improve fuel economy by ensuring that the engine receives a constant supply of clean, fresh air, resulting in better combustion and improved fuel efficiency.
  1. Will a Mazda BT50 snorkel affect my vehicle’s warranty?
  • It’s best to consult with your dealership or manufacturer to determine if installing a snorkel will affect your vehicle’s warranty. In most cases, a properly installed snorkel should not affect the warranty.
  1. How often should I clean my Mazda BT50 snorkel?
  • It’s recommended to clean your Mazda BT50 snorkel every 10,000 km or as needed depending on the conditions you drive in. Regular cleaning helps ensure that the snorkel is working effectively and protecting your engine.

In conclusion, a Mazda BT50 snorkel is a must-have accessory for any off-roading enthusiast. It provides vital protection to your engine, improves performance, and enhances your overall off-roading experience. When choosing a snorkel, be sure to consider quality, compatibility, and installation. With the right snorkel, you can take your adventures to the next level, exploring new terrains with confidence and peace of mind.

Root Canal Recovery: What to Expect After Treatment in Brisbane

Root canal treatment is a crucial dental procedure aimed at saving a tooth from extraction. After undergoing this procedure, understanding what to expect during the recovery period is essential for a smooth and successful healing process. This guide provides insights into root canal brisbane recovery, outlining the immediate aftercare, medications, dietary recommendations, oral hygiene practices, and addressing potential side effects for individuals in Brisbane.

Immediate Aftercare

Immediately after a root canal treatment, patients may experience some discomfort. Managing this discomfort involves avoiding pressure on the treated tooth and being mindful of oral hygiene practices. It’s crucial to follow the dentist bardon guidelines for the initial aftercare period.

Medications and Pain Management

Prescribed medications play a crucial role in managing pain and preventing infection after a root canal. Patients should take these medications as directed by their dentist. Additionally, over-the-counter pain relief options can be used as recommended.

Dietary Restrictions and Recommendations

Following root canal treatment, patients are advised to avoid certain foods and beverages that may cause discomfort or disrupt the healing process. Opting for soft, easy-to-chew options in the initial days helps prevent unnecessary strain on the treated tooth.

Oral Hygiene Practices

Maintaining proper oral hygiene is crucial for successful root canal recovery. Gentle brushing and flossing around the treated area, along with the use of recommended oral rinses, contribute to a clean and infection-free healing environment.

Managing Swelling and Discomfort

Applying cold compresses to the outside of the face helps reduce swelling and manage discomfort. Keeping the head elevated, especially during sleep, contributes to a more comfortable recovery experience.

Follow-Up Appointments

Scheduled follow-up visits with the dentist are essential to monitor the progress of the recovery and address any concerns or unexpected symptoms. These appointments ensure that the treated tooth is healing correctly.

Returning to Normal Activities

Patients can gradually reintroduce regular activities after the initial recovery period. Exercise and physical activity can be resumed, keeping in mind the importance of listening to the body and avoiding activities that may impact the treated tooth.

Potential Side Effects and Complications

Understanding normal post-treatment side effects, such as mild discomfort or sensitivity, is crucial. However, recognizing signs of complications, such as severe pain, swelling, or discharge, is equally important. Seeking prompt dental attention in case of complications ensures timely intervention.

Emotional Well-being and Recovery

The emotional aspect of recovery is often overlooked. Coping with post-treatment emotions, including anxiety or fear, contributes to an overall positive recovery experience. Maintaining open communication with the dentist about any concerns is encouraged.

Maintaining Long-Term Oral Health

Root canal treatment is a step towards preserving oral health, but long-term maintenance is key. Regular dental check-ups, adherence to oral hygiene practices, and proactive measures contribute to preventing future dental issues.

Patient Experiences and Testimonials

Real-life stories from individuals who have undergone root canal treatment provide insights into the positive outcomes and restored oral health achieved through proper recovery practices.

Common Myths About Root Canal Recovery

Dispelling common myths surrounding root canal recovery, such as prolonged discomfort or ineffectiveness of the procedure, helps individuals approach the recovery process with accurate information and confidence.

Conclusion

In conclusion, understanding what to expect after root canal treatment in Brisbane is crucial for a successful recovery. Proper aftercare, medications, dietary considerations, and follow-up appointments contribute to a smooth healing process. Brisbane residents undergoing root canal treatment are encouraged to prioritize their recovery for optimal oral health.

Frequently Asked Questions (FAQs)

  1. How long does the discomfort last after a root canal?
    • Discomfort after a root canal is typically mild and temporary, lasting a few days to a week.
  2. Can I eat normally after a root canal?
    • Initially, patients are advised to choose soft, easy-to-chew foods, gradually returning to a normal diet as comfort allows.
  3. Is swelling normal after a root canal?
    • Mild swelling is normal and can be managed with cold compresses; severe or persistent swelling should be reported to the dentist.
  4. When can I resume regular oral hygiene practices?
    • Gentle brushing and flossing around the treated area can typically be resumed immediately after the procedure.
  5. Are root canals always successful?
    • Root canals have a high success rate, but individual outcomes may vary; following post-treatment guidelines enhances the chances of success.

Muc-Off Mudguards: A Deep Dive into Ultimate Mud Protection for Cyclists

Cycling through muddy terrains can be exhilarating, but the aftermath of a messy bike and rider is less enjoyable. Enter Muc-Off Mudguards, designed to tackle the challenges of off-road cycling by providing ultimate protection against mud and debris. In this comprehensive guide, we’ll delve into the features and advantages that make muc off mudguards a top choice for cyclists seeking an unrivaled mud-shielding solution.

Innovative Design for Superior Mud Deflection

Dual-Composite Construction

Muc-Off Mudguards boast a dual-composite construction, combining flexibility and durability. This innovative design ensures that the mudguards effectively deflect mud and debris without compromising on strength.

Extended Coverage Area

Muc-Off Mudguards feature an extended design, providing ample coverage to shield both the rider and the bike from mud splatter. The enhanced coverage ensures a cleaner and more enjoyable off-road cycling experience.

Easy Installation and Universal Compatibility

Quick-Release Attachment System

Designed for user convenience, Muc-Off Mudguards incorporate a quick-release attachment system. This feature streamlines the installation process, allowing cyclists to equip and remove the mudguards swiftly as needed.

Universal Fit for Various Bikes

Muc-Off Mudguards are engineered with a universal fit, making them compatible with a wide range of mountain bikes. Whether you ride a hardtail, full-suspension, or gravel bike, Muc-Off Mudguards are designed to accommodate diverse bike models.

Optimized Aerodynamics for Uninterrupted Performance

Aero-Focused Design

Muc-Off understands the importance of aerodynamics in cycling performance. The mudguards are designed with an aero-focused approach, minimizing any potential impact on your bike’s aerodynamic efficiency.

Wind Tunnel Tested

To ensure that the mudguards do not compromise speed and performance, Muc-Off conducts wind tunnel tests. This meticulous testing process guarantees that the mudguards maintain optimal aerodynamics during your rides.

Durable and Lightweight Construction

High-Quality Materials

Muc-Off Mudguards are crafted from high-quality materials known for their durability. This ensures that the mudguards withstand the rigors of off-road cycling, including vibrations, impacts, and exposure to the elements.

Lightweight Design

Despite their robust construction, Muc-Off Mudguards maintain a lightweight profile. This balance between durability and weight ensures that the mudguards enhance your ride without adding unnecessary bulk to your bike.

Maintenance and Cleaning Tips for Muc-Off Mudguards

Regular Inspection

Periodically inspect your Muc-Off Mudguards for any signs of wear, damage, or misalignment. This ensures that they continue to provide optimal protection during your off-road adventures.

Quick Cleaning After Each Ride

Muc-Off Mudguards are designed for easy cleaning. After muddy rides, promptly clean the mudguards along with the rest of your bike to maintain their effectiveness and appearance.

Storing Properly Between Rides

When storing your bike, pay attention to the mudguards. Ensure they are properly secured or removed if needed. This practice prevents damage and ensures they’re ready for action on your next ride.

Conclusion

Muc-Off Mudguards stand out as a pinnacle of mud protection, offering cyclists a reliable and efficient solution for off-road adventures. With their innovative design, easy installation, and dedication to aerodynamic performance, Muc-Off Mudguards elevate the cycling experience by keeping you and your bike cleaner on muddy trails. Consider investing in Muc-Off Mudguards for the ultimate mud-shielding solution that enhances both performance and enjoyment.

FAQs

  1. Can Muc-Off Mudguards be used on road bikes?
    • While Muc-Off Mudguards are designed with a focus on off-road cycling, their universal fit may make them compatible with some road bikes. Check the specific product details for compatibility information.
  2. Are Muc-Off Mudguards suitable for all weather conditions?
    • Yes, Muc-Off Mudguards are designed to withstand various weather conditions, including rain and mud. Their durable construction ensures effective mud protection in diverse off-road environments.
  3. Do Muc-Off Mudguards fit full-suspension mountain bikes?
    • Yes, Muc-Off Mudguards are engineered with a universal fit, making them suitable for various mountain bike models, including full-suspension bikes.
  4. How do I clean Muc-Off Mudguards?
    • Muc-Off Mudguards are easy to clean. After a muddy ride, use a gentle cleaner or water to remove mud and debris. Avoid abrasive materials that may scratch the surface.
  5. Can I use Muc-Off Mudguards for downhill mountain biking?
    • Yes, Muc-Off Mudguards are designed to withstand the demands of downhill mountain biking, providing effective mud protection for both the rider and the bike.